The finest photography advice for beginners can help you progress from taking pictures to producing works of art. Are you a beginner when it comes to photography? Do you want to get into digital photography but aren’t sure where to begin? You’re about to enter a great and enjoyable world that will offer you enough delight to last a lifetime, and it’ll be easier than ever before thanks to this beginning photography advice.
We’ve selected the greatest photography tips and techniques for beginners to assist you with your initial steps, but experienced photographers can also benefit from many of these suggestions, either as a reminder or as a new perspective on the joy of shooting.
1. Make Use of Reflections


When you employ reflecting surfaces to produce an artistic echo of a scene, you’re doing reflection photography, or also known as mirror photography. Oceans, lakes, puddles, and even rain droplets may be used in this kind of photography to bring a new twist to areas that are popular with photographers. They’re all typical topics for creating beautiful reflection shots. Metal, tiles, mirrors, and anything else with a gleaming surface, for example, may all be simply integrated into this sort of picture.
Tips on how to take reflection photos:
Tip 1: Look for a reflective area
Finding a reflecting surface is the first step. Reflective surfaces are practically all around us if you educate your sight to look for them. On any surface of water can be found most stunning reflections. Aside from water, fantastic reflections may be seen on any glass surface, sparkling automobiles, wet asphalt, ice, or even your own eyewear.
Tip 2: Choose your subject
There are a lot of good subjects for reflection photography. You can capture mountains and other landscapes along with their image mirrored in a lake or bodies of water. People, too, are amazing subjects. Making use of their silhouettes and reflections will make it look interesting and dramatic. Geometric structures are also very ideal to create an extended image of the structure itself.
2. Capture Symmetrical Figures or Structures


Symmetry may be seen in many places. This implies that no matter where you are, you can improve your symmetry photography skills. Symmetry arises in photography when components of your composition mirror each other. When two half of your scene seem the same and balance each other out, it’s called symmetry. Symmetry refers to anything that is clean, proportionate, and balanced, and it makes images look nice, tidy, and clinical.
Here are some effective photography tips to achieve symmetrical photos:
Tip 1: Use architectural structures
When it comes to symmetry photography, you should absolutely try your hand at architectural structures. Symmetry is one of the most practiced principles in architecture and its application can be found a lot in buildings and aesthetic structures.
Tip 2: Use Reflections
You can also achieve symmetrical photos by using reflections. Take photos near bodies of water or by using surfaces like glass to create a reflective effect. This wil also aid in the development of your symmetrical photographic abilities. A makeshift setup resembling this will also assist you in improving your studio photography skills.
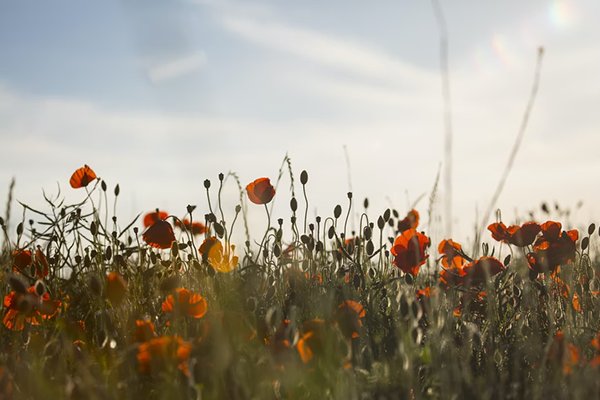
3. Make Use of Natural Light


The sun is used as a light source in natural light photography. The amount of sunlight accessible changes depending on the time of day. An overcast day may bring texture and complexity to a photographer, whereas a sunny day delivers full illumination. Many photographers seek out what is known as “the golden hour,” a time of warm light that occurs just after sunrise and before dusk. This is in contrast to photography taken in the middle of the day, when the direct sun may cast an unduly harsh light on an item or a subject’s face.
Here’s you can benefit from making use of natural light in taking photos:
Tip 1: Make use of the varying hues of the sun throughout the day.
Oranges and yellows dominate the mellow light of morning and sunset. More blue light is present in the midday sun. On a hot day, the sun beaming through a layer of clouds provides an especially blue light, which is too harsh for many uses.
Tip 2: Make use of both organic and inorganic illumination.
When it comes to natural lighting, most skilled photographers don’t follow strict guidelines. If it’s coming from a safe distance, a camera flash can improve an outside photograph. Films may supplement sunshine with a few permanent lighting equipment, with the purpose of having more light in front of the subject than behind it. Having amazing images is more essential than having the finest technique at the end of the day.
4. Abstract


Abstract photography is one of the finest methods for any prospective photographer to get started in the field. Abstract photography defies numerous photographic norms when compared to other popular photography categories such as product, outdoor, and wedding photography. It provides you the flexibility to photograph anything that catches your eye, allowing you to express your artistic side. Odd yet aesthetically appealing images of items that don’t seem to express a specific story but nonetheless mystify and fascinate viewers on a deeper level are among the most acclaimed—and expensive—works of art.
Tip 1: Begin with commonplace items.
Abstract photography necessitates a variety of various perspectives. It may be beneficial to begin practicing using items you already have at home. You’ll be able to think and perceive things abstractly wherever you are after you’ve become used to viewing banal, daily things beyond their typical context.
Tip 2: Shoot through objects
Creating genuinely unusual and abstract photos with a DIY lens “filter” is possible. Colored filters and gels, for example, can save you time from having to edit your images only to add a splash of color. Shooting through translucent glass, water, or even a car window on a wet day can provide unique yet visually appealing photographs due to distortions and light diffractions.
5. Take Aerial Shots


Aerial photography is a fascinating specialty that professionals employ for a variety of reasons, and there are several sorts of aerial photography. Aerial photographing is the art of taking photos from such a higher elevation, typically with the use of flying devices, such as jets, aircraft, hot-air balloons, and, more frequently, drones.
To be termed an aerial photograph, the image must be captured with non-ground-based technology. It’s also not the same as air-to-air photography, in which photographers take photos of other planes or airborne devices.
Take aerial photos using the following photography tips:
Tip 1: Make use of a quick shutter speed
Set a fast shutter speed of 1/500 (for a 24–70mm lens) to get off to a solid start. You’ll need to shoot quickly as the focal length gets longer. To easily address this, use shutter priority mode. Helicopters may travel at a slower pace than aircraft and hover when necessary, allowing you to use a slower shutter speed. You’ll need to increase the ISO to attain a quicker shutter speed while maintaining a nice depth of field. Start with ISO 640 and adjust up or down based on the amount of light in your scene.
Step 2: Use the right camera settings
Prepare your camera ahead of time. For the most part, this entails selecting the quickest camera option. To avoid motion blur, pick aperture priority mode (since the light may change) and boost your ISO. Given that you’re shooting from a moving vehicle, you’ll need to strike a balance between your f-stop and ISO settings in order to get as many clear images as possible. Depending on the focal length and duration of your trip, you may utilize an ISO of up to 1000 and an aperture as small as 2.8.
6. Black and White


Black and white photography is the ability to produce compelling images by merging various tones, ranging from bright to gloomy. This kind of photography has a lengthy history and has been one of the photography trends for a long time, almost as long as photography itself. Monochrome photographs had been existing for 35 years when photographers acquired the first persistent color image in 1861.
Even though color is the new kid on the block, it hasn’t completely supplanted black-and-white photography. Color may be distracting; it can also be lifeless and dreary. One of a photographer’s responsibilities is to reduce an image, reducing a situation to its core. That essence might be colorless at times.
Tip 1: Look for shots with a lot of contrast.
Consider a portrait with a dark backdrop against a bright sky or dark hills against a bright sky. The contrast between light and dark in such a subject matter is striking, and those contrasts will come through in a magnificent black and white shot.
Tip 2: In street photography, keep an eye on the light sources.
The trick to urban photography is to be aware of the different light sources that might bleed into your final image—headlights, street lights, neon lights, and, of obviously, sunlight. To capture a gamut of varying colors of gray, utilize these light sources.
7. Candid


Any sort of photography that is authentic and at the moment is referred to as candid photography. There are no prepared photos or phony grins. There are no fake sensations here. It’s possible that the subjects are aware that you’re shooting them. The presence of the camera, however, does not pull them out of the moment.
A phony grin or artificial face is simple to recognize, and it’s the quickest path to a lousy shot. A candid photograph, on the other hand, allows actual emotions to flow through. You may be photographing portraits, events, or weddings. Travel, street photography, and family photography are all options. As a professional photographer, learning how to acquire candid pictures will take you to a new level.
Tip 1: Take your camera with you every time and shoot pictures as you go
What’s the greatest approach to shoot images on the spur of the moment? Always keep a camera handy! That way, when the opportunity arises, you can swiftly turn on the camera, snap a few images, and (assuming everything goes well!) obtain a fantastic outcome. Of course, you don’t need to go out and buy an expensive second body; smartphone cameras are already of excellent quality and more than suitable for most candid shots.
Tip 2: Get rid of the flash
Perhaps the most apparent manner of alerting someone that you’re shooting them? Using a flash (particularly the top-of-the-camera flash!). After all, nothing beats a brilliant flash of light to grab attention and pass the time. Keep your flash off for candid pictures if at all feasible. Instead of utilizing flash, consider increasing your ISO, opening up your aperture, or slowing down your shutter speed while shooting in low light.
Important Tip to Remember:
Never take candid photos for the purpose of selling them commercially. You need to get the person’s permission before doing so. This will save you from being sued and will help you maintain your ethics as a photographer.
8. Macro Shots


Photographing at high magnifications is referred to as macro photography. This might need the employment of a macro lens, which is intended to capture detailed, close-up images. A genuine macro shot, also known as 1:1 magnification, generates an image on the camera sensor that is the same size as the scene in real life. As a result, if you wanted to shoot an inch-long flower, you’d need the bloom to cover an inch of your camera sensor.
Tip 1: Make sure your topic is in the best possible position for maximum effect.
In macro photography, the composition is crucial; by placing your pieces in different places of the frame, you may create drastically different outcomes. In reality, the difference between a dull, snapshot-like photograph and a spectacular one can be determined by composition. You may obtain a great harmony while preserving lots of visual movement by placing your subject a third of the way into the frame, which is also known as dynamism.
Tip 2: Beautiful lighting effects may be achieved by shooting into the sun
All you have to do is select a suitable subject, come near to it, and position it in front of the sun. I recommend doing this approach around dawn or sunset, as this is when the impact is most dramatic. Don’t gaze straight at the sun via your camera, especially at high magnifications.
9. Dark and Moody


Photographing a moody portrait doesn’t have to be depressing or painful in any way. You may take a snapshot of a happy individual and end up with a melancholy image. In melancholic photography, lighting, themes, and perspectives all play a crucial influence. Simply changing one aspect of your image may transform it into something richer and more meaningful. This is why color correcting is so crucial in this type of photography.
Take dark and moody photographs by using the following photography tips:
Tip 1: Use direct light and shadows to draw attention to specific features of your model’s face.
The harshness of direct light is common. In other types of photography, this can be a pain. It’s a helpful tool in melancholy photography. To create a feeling of mystery, combine direct light with shadows. Using curtains or other types of cloth, create a shadow pattern. You’ll be able to concentrate just on the eyes or lips of your model. To produce distinct shadows on your subject’s face, use branches, hair, hands, and window curtains.
Tip 2: Make Your Photos Look “Well Worn” by Using Textures
With time, developed pictures and prints get well-worn. They have an ethereal quality due to their fading appearance and ragged edges. They can, however, be recreated with an editing application. To make your images appear like they’ve been there for a long time, you may utilize stock photos of grain, scratches, and other textures. This will add to the eerie atmosphere. It will also allow you to experiment with stock pictures.
10. Light and Airy


While vibrant hues and ominous sky might be captivating, light and airy photography is a breath of fresh air. In recent years, this design has risen to prominence, notably in the lifestyle sector. To the untrained eye, it seems to be nothing more than a simple exposure modification. This approach, however, has more to it than meets the eye.
Tip 1: Shoot at the golden hour
Shooting an hour before sunset is really lovely and gives photographs such a lovely glow. Make every effort to arrange sessions around this time, and if it must be earlier in the day, choose a location with shade to avoid the intense sun!
Tip 2: Create space between the subject and the backdrop by using light backgrounds
Shooting in front of a white wall will appear much brighter than shooting in the middle of a dark jungle! While we don’t believe that every shot should be taken in front of a white wall since flora is so lovely, it does assist to create space between the subject and the background, making the background more out of focus and soft. This enhances the dreamy, light character of the photograph by making the subject stand out more and appear crisper.
Takeaway…
Being knowledgeable of the latest photography trends in the business is really important. Whether it’s for wedding photographs, stock images, or product photography, recognizing what and how to capture keeps you ahead of the curve. Clients are always on the search for new adventures. Businesses are using photos that nobody has because it makes their products unique. These 2022 photography trends will definitely inspire and make you burst at the seams with fresh concepts!
")


thanks for the tips